Ok folks. On to part 2! In this installment, we'll cover cutting and marking. Warning: photo heavy post ahead.
Cutting out your pattern
Dig the first page of instructions out of your pattern envelope, and find the pattern layout for the blouse (view A, it's in the lower left corner).
This will tell you which pattern pieces to use (in this case, pieces 1, 2, 3, and 4). Pull out the giangantor pieces of tissue paper and locate the correct pieces in your size. Some sewists like to trace the pieces onto newsprint rather than cutting the pattern itself. I usually just cut the pattern unless I plan to re-use it quite a lot. If you do choose to trace, remember to include all of your grain lines and markings. Oh! And don't use your fabric scissors for cutting paper. It dulls them faster.
After I cut my pattern pieces, I like to press them with a warm iron on a low setting (no steam) to take out some of the creases and make them lay more flat.
Laying out your pattern pieces
Locate the correct cutting layout for your size. I don't always use the exact layout that's been provided with the pattern, but it's always a good place to start. For this project, you will fold your fabric right side out, selvage edges together. Selvages are the finished, non-fraying edges of the fabric.
Now we're ready to pin our pattern pieces to the fabric! All four of the pieces for this project will be cut on out on the fold. How do we know? Grain lines!
Each pattern piece is printed with a grain line. As stated above, a straight arrow means you place the pattern piece parallel to the selvage edge. An arrow that is pointed downward at the ends means you place the pattern piece on the fold of your fabric.
If you look at the cutting layout, you'll notice that pattern piece number 2 is gray. That means you need to pin the piece printed side down, like so:
Continue to lay your pieces on the fabric, pinning as you go. I like to pin on the fold first and work my way outward on each piece. I ended up straying from the cutting layout slightly, as I was able to fit the neck facing pieces on the fabric with the main pieces.
Before we start to cut, notice the little triangle shapes on some of the edges of each pattern piece. These are called notches, and will help you match the pieces in the correct places when you sew. Here's where I get to share one of my favorite sewing tips! When I starting sewing with patterns, I learned that notches were always supposed to be cut in an outward triangle shape, like this:
and that's fine, but sometimes I couldn't get my pieces to match up quite as easily. When I starting taking sewing studio classes in college, my awesome instructor taught me a trick that honestly rocked my sewing world. Rather than cutting notches outward, she would make a tiny little nip inward, right down the center of the notch, using the tip of her scissors.
Heavens to Betsy! This went against everything I'd ever been taught about never EVER cutting into my seam allowances. But ya know what? A tiny little 1/4" nip didn't hurt a thing, and it made matching my pieces so much faster and easier.
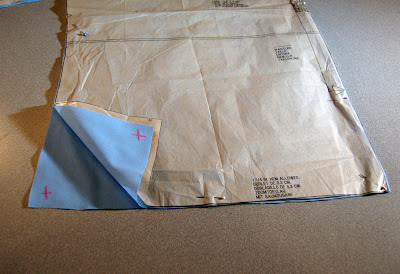
Go ahead and cut out your fabric pieces, making sure to get all of the notches (however you choose to cut them). Once I started this sew-along, I realized I probably should have chosen a printed fabric rather than a solid color. It can be confusing to figure out which side of your fabric is the right side (the side that will face out on your finished garment) and which is the wrong side with a solid. After I've cut out all of my pattern pieces, I like to take a chalk pencil and make an X on the wrong side of each one.
This little extra step goes a long way in helping me distinguish the right side of the fabric from the wrong side throughout the sewing process.
Time to cut the interfacing! Fold your interfacing with the little white bumps to the inside, pin pieces 3 and 4, and cut.
Please excuse the wrinkles. I tend to buy interfacing in bulk when it goes on sale, and keep it in a plastic storage container. The wrinkles won't matter much in a few steps, anyway!
Now that we have all of our pieces cut out, it's time to move on to marking!
Marking
I'm not gonna lie, this is probably my least favorite thing to do when it comes sewing. Once the pieces are cut, I want to zoom over to my machine and get down to some serious stitching! But, it's one of those necessary evils that will probably save a lot of tears and frustration later, so it must be done. Luckily, this pattern doesn't have an excessive amount of markings. Let's start with the dots.
If you look at piece number 1, you'll see a circle with a letter M (or S or L, or whatever size you're making) in the middle, right under the armhole.
Look at piece 2, and you'll find the same circle:
These circles are pretty important. They tell us where to stop sewing in order to form the armhole of our blouse. You can't have a blouse without a place to put your arms, right? There are several ways to mark your pieces, but my favorite (taught to me by the same awesome instructor who showed me the notch trick above) is the pin and chalk method. It's a little bit awkward to explain, but I'm going to try my darndest and use a lot of photos.
We're going to make our markings on the wrong side (what will become the inside of your finished garment) of the fabric, so un-pin and unfold piece 1 and place it on a flat surface, right side up.
Next, lay your pattern piece over one side of your fabric, and use a few pins to hold it in place.
Ok, here's the tricky to explain part. Take a pin, and from the wrong side, push the pin up through the bottom of the dot, and back down through at the top of the dot. It'll look like this from the right side of the fabric:
And here's what it looks like from the wrong side of the fabric:
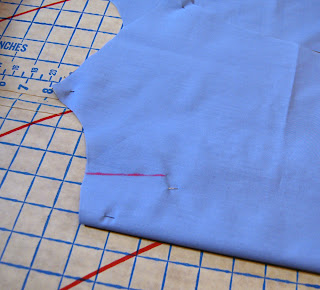
Now, on the wrong side of the fabric, take a chalk pencil and rub it over the fabric where the pin is, like so:
Remove the pin. Voila! You have a perfect little mark.
Ok, now repeat this for the opposite side of piece number 1. Remember, you'll have to flip your pattern piece face down, like this:
Once you have the other dot marked, you'll have 2 perfect little lines on the wrong side of your fabric where the armholes will be.
Good job! Now go and do the same thing with pattern piece number 2. Then it's on to marking the pleats.
Locate the dotted lines at the neckline marked with your size (in my case, the longer lines marked with M).
We're going to mark these lines in basically the same way we did the dots, using the pin and chalk method. I like to use one pin for the very bottom of each line, one at the top, and one in the middle, like this:
Rub your chalk pencil over each pin, just like you did for the dots, and you'll end up with 3 little lines.
Take a ruler, and connect the little lines.
When you're done, you'll have a nice straight pleat line.
Go through and mark each pleat line, and you'll end up with this:
aaaand we're done marking! Hooray!
If you made it to the end of this post, good for you! I know it was super long. I just want to make sure to include every detail. Next up, it's the post we've all been waiting for. It's time....to start....SEWING!


Yay! Can't wait to see the sewing. Cutting out fabric is the worst part for me... such a chore! I just want to sew!! I'm looking forward to the next steps!
ReplyDelete