Showing posts with label sewing. Show all posts

Sunday, May 5, 2013

Currently on my cutting table

Yes, just my cutting table.  Nothing has made it to my sewing table for quite some time now.  But! I am hopeful. I'll find my balance soon.  The cutting table is better than, well, no table at all, right?


Because I'm always trying to learn more about fit, I picked up this Palmer/Pletsch pattern with built in alteration lines. I've cut out view B in the trusty blue fabric I use for making muslins, but plan to use this if the muslin turns out well:


Just some cotton from my collection, as usual. A closer look at the tiny print:


I remember buying this for some other top that never got made, but I don't remember where. Either JoAnn's or a quilt store, most likely.

One other neat sewing related thing I'm slowly working on; I'm taking Angela Wolf's Tailoring Ready to Wear class on Craftsy! I've always wanted to learn more about alterations, but it's a pretty hush-hush subject. I could never really find many books or anything. Tailors and sewists trying to protect their techniques, perhaps? Anyway, the class has been great. I can go at my own pace and watch the videos any time. I've made it through lesson 5.  A few things I already knew, but have also picked up some really great techniques that were new to me. The class is on sale right now for $24.99, so if you've ever been curious about altering clothing for yourself or your friends and family, you should definitely check it out!

Thursday, January 17, 2013

What's up with Simplicity 2147?


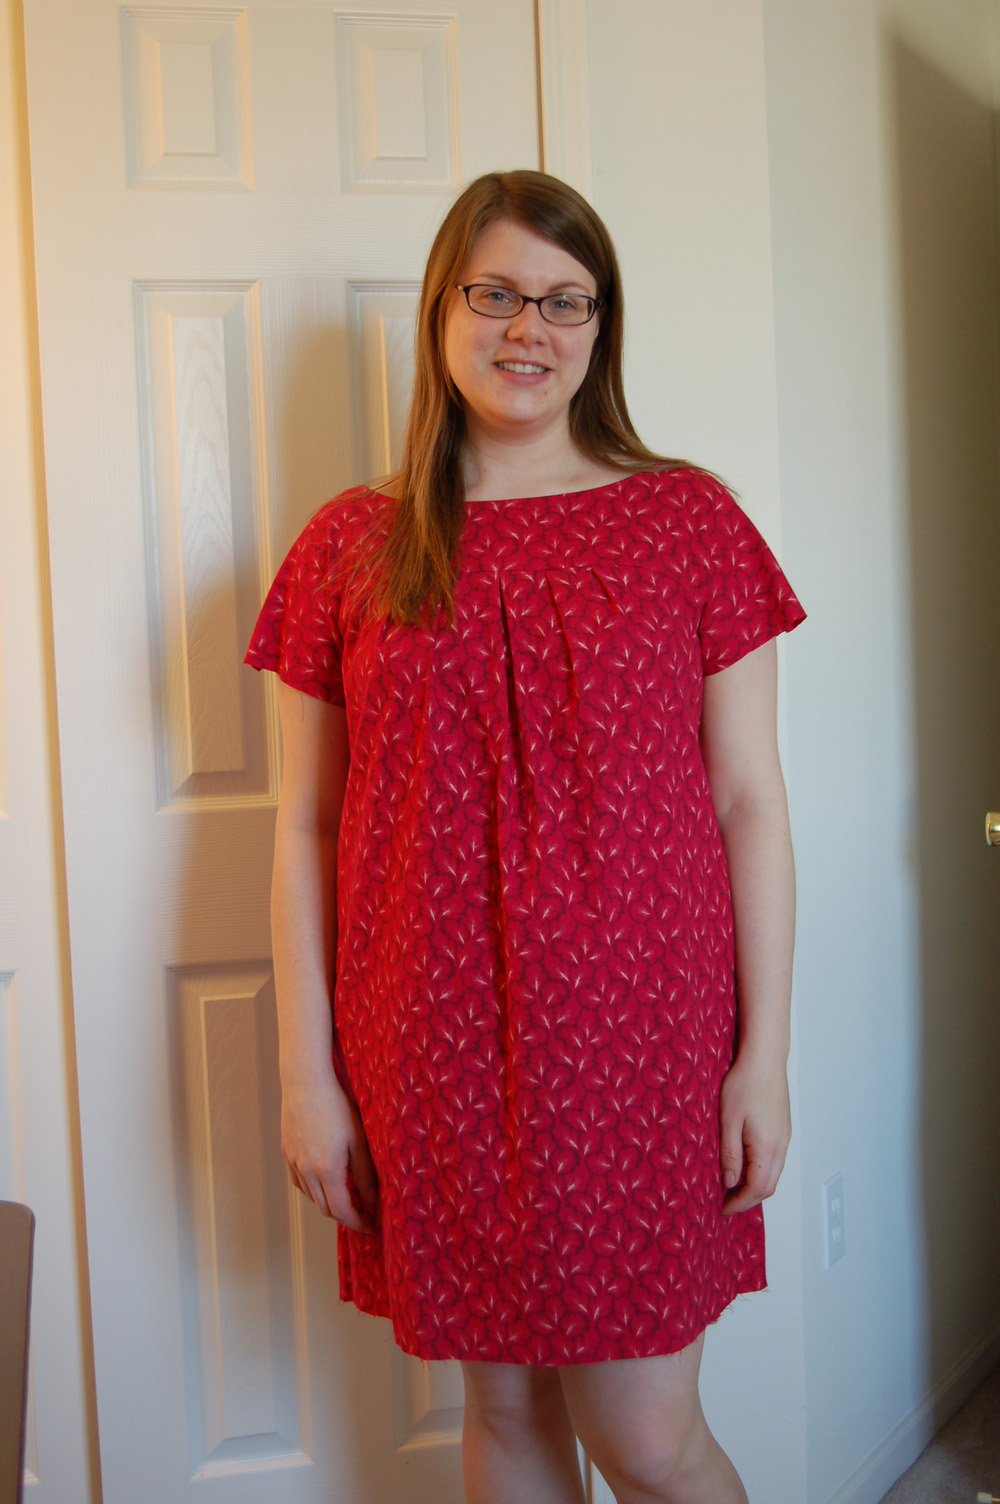
I started this project before we moved, sewing it up to the point where all I would normally have left to do is hem the sleeves and bottom edge.  But, as soon as I tried it on, I was not crazy about the fit.


Ok.  Not the worst, but it definitely has a house dress/hospital gown feel for me.  Now let's turn it to the side...


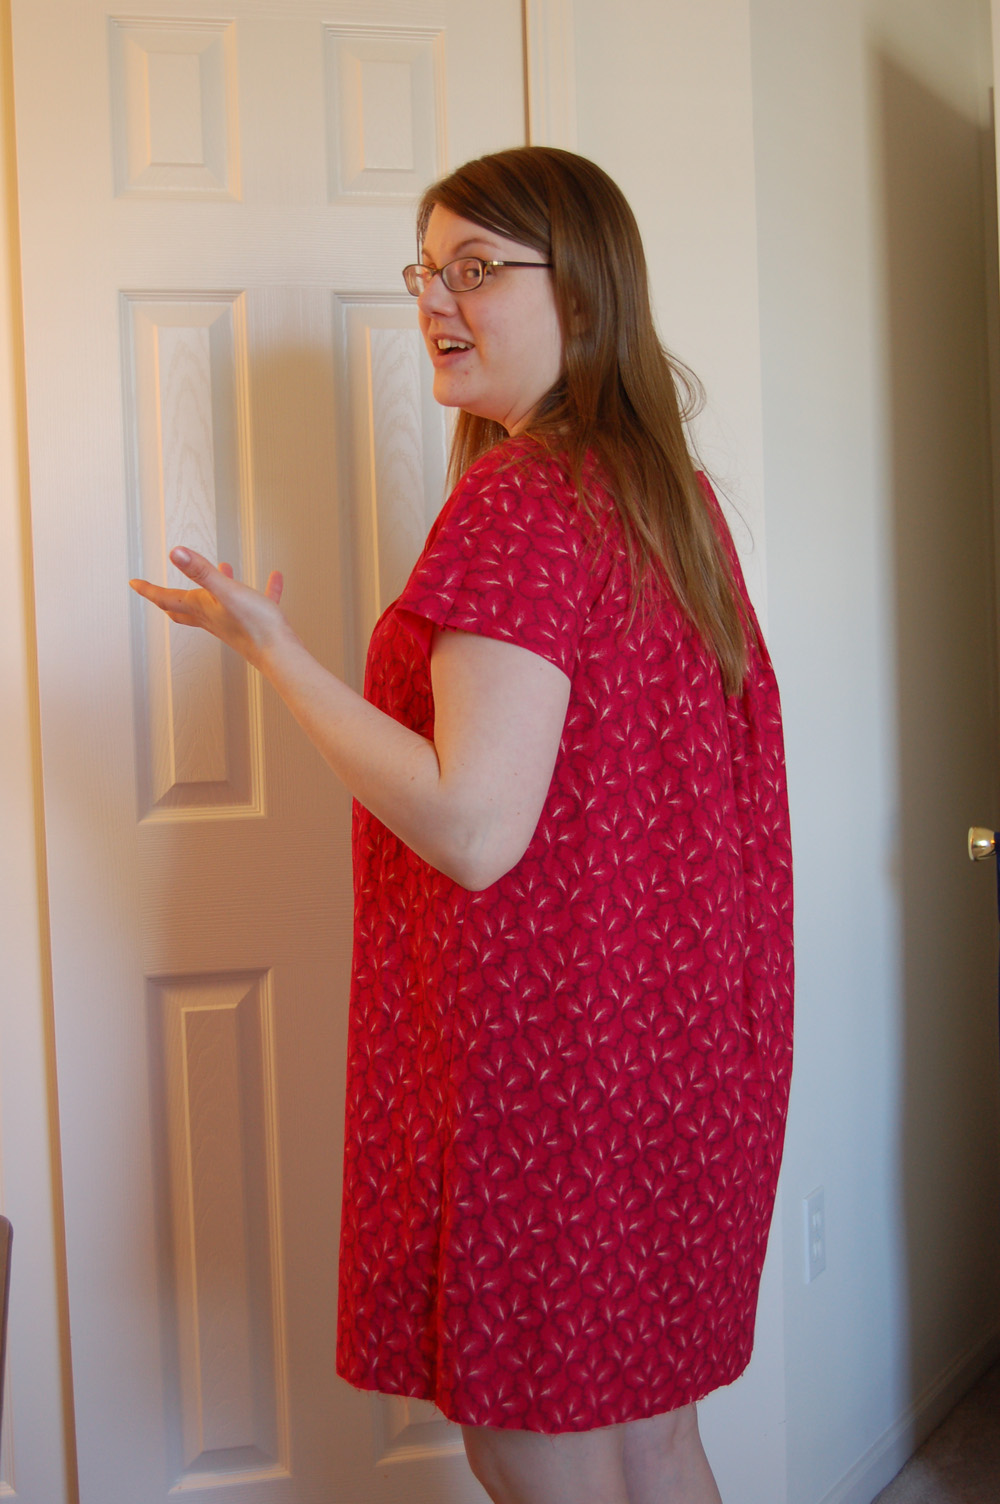
Theeeere it is.  Baby got back.  This is not a good look for me.  I'm not positive, but I think the back pleats just make the whole thing too full.  Maybe if I add a belt?


Better.  But, let's turn it to the side again...


Ok.  Not flattering.  At all.  One last try...let's add a cardigan.


Looks ok, but I'm not sure if I actually want to wear a cardigan with it all the time just to make it passable.  I can't tell if the whole look of the dress is just wrong for me, or if re-making it without the pleats in the back could make it look better.  As for this particular dress, I'm thinking of cutting it off and making it a top. What do you think?

Wednesday, January 2, 2013

Guest Post at The Dressmaking Diaries

Hi friends!

Today I'm guest posting over at The Dressmaking Diaries.  I've put together a simple tutorial for a bread cover.


Go and have a look!    

Sunday, December 30, 2012

Knitting Needle Roll

I'm catching up and recovering from the holiday whirlwind! We didn't have nearly as far to go this year (a 1 hour drive to Ed's family and 2 hours to mine).  A nice treat, although somehow our house still managed to get messy while we were away. How does that even work?? Anyway, now that gift giving is over, I can share something I made for Ed's grandma!

A roll for some of her knitting needles (being modeled by some of mine)! During a visit, she mentioned that she was thinking of buying or making one.  I promptly went home and scoured the internet for the perfect tutorial, finally settling on this one.  I really do love this particular tutorial.  The roll couldn't have been easier to put together!  I may just make one for myself.


All rolled up, neat and tidy.  This wasn't her main gift, just a little somethin' extra.  The fam all pitched in and got grandma an iPad!  Watch out, world.

Speaking of watch out world, my parents are finally getting internet access!  Welcome to the late 90's, you guys!  We passed an old MacBook on to them (it once belonged to my husband, then me), got them a wireless router, and made an appointment with their cable company.  Now I just have to show them what to do.  Any suggestions for websites, videos, etc. on how to guide a non tech-savvy person through the interwebs?

Wednesday, December 19, 2012

Owl Pals

Hiya everyone!  I just wanted to quickly share the owl pillows I sewed up for a certain little lady's birthday.


They're from a printed fabric panel, and therefore were super quick and easy to whip up.  Just cut around the edges, sew, stuff, and stitch them closed.  I picked up the panel a while back because I loooove me some owls.  The design feels a bit young and girly, so I knew I probably wouldn't be making these for myself.  Let's see....who do I know that is young and girly...


Little Miss Emmy!  She is my bestie's youngest, and she just turned 3.  Her birthday was a few days ago, but I won't be able to give her her new owl pals until after Christmas. Gee, I hope she doesn't read my blog... 

Wednesday, November 28, 2012

Round Tablecloth Tutorial

As promised, a tutorial for the tablecloth featured in this post!  Most cloths you'll find in stores are just one big circle of fabric.  This one is slightly different, as the drop (the part that hangs off of the side of the table) is cut out and then stitched to the top.  This makes for a much more fitted look.  I think it keeps the tablecloth in place a little bit better, too.   My table is about 40" across, but this project is customizable to different sizes, whether it be for a dining table, side table, etc.  My nightstand is round, and I'm itching to make a smaller version to cover it!

You will need:
medium weight fabric (the amount depends on how big your table is.  I got by with 2.5 yards of 45" wide fabric)

coordinating thread

2 packages of single fold bias tape

a length of string or yarn

a pencil

Tuesday, November 20, 2012

A Retro Tablecloth for a Retro Table

Ever since we purchased our new dining table last year, I've been meaning to make a cloth to cover it.  The table looks great on its own, but I am very afraid of the top getting scratched.  Fast forward a year and I've finally gotten around to doing something about it! 


The cloth kind of looks like it came from a very groovy children's birthday party that took place in the early 70s.  I love it.  The fabric has been sitting in my stash for who know how long.  I knew it needed to be made into something, it just took a while for me to figure out that it needed to be a tablecloth.  I'm working up a tutorial and hope to have it posted after the Thanksgiving madness has subsided.  We're hosting this year!

Friday, November 2, 2012

Bookshelf Update

Look what my sweet husband showed up with a couple of days after last my post:

Expidit shelves from Ikea!  2 of the 4 shelf squares (shown here), AND one of the 8 shelf units (which we ended up using for DVDs).

He was in Pittsburgh for work, but I never expected him to surprise me with these.  We both drive pretty smallish to average sized cars.  I didn't think it was possible to fit all of the shelves in his, but he managed.  The 8 shelf Expidit required him to remove the headrest on the drivers side and recline the seat all the way back.  The things he does for me :) 

I'm pretty happy with them so far.  Most of my books fit into one of the shelves, and I'm using the other for craft/stationery related storage.  

Rather than shove some of larger my sewing tools into the closet, I decided to leave them out on display.  I use them enough, and they're pretty to look at, so why hide them away?  The sewing box used to belong to my mom, the tailor's ham, sleeve roll, and hem marker were thrifted somewhere along they way, the owl was a handmade gift from my friend Katie, and I picked up the print at this year's Renegade Craft Fair from Rhymes with Twee.  Things are really coming together in this space.  The final piece is a small bed for guests.  I have the frame set up, the bedding is ready to go, and the mattress is on its way.  Who's coming to visit? 

Thursday, October 25, 2012

Keepin it Real: My sewing space is a mess.

Hi friends!

I showed you a few photos of some of the nicer looking parts of our new home.  Now it's time for one that doesn't look so nice:
 Clutter-rific.  My problem at the moment is lack of shelves to put things on.  Want to see where my sewing books live right now?

 I had all of them mixed in with our regular books on our giant bookshelf previously, but didn't really like that so much.  I'd rather have them close at hand.

I really feel that if my books had a home, it would get the ball rolling for me to figure out where everything else goes.  My original idea was to get another Expedit shelf from Ikea and use it sideways.  I just really liked the idea of a long, low shelf.  Preferably in white.  But, because we no longer live in Chicago, the closest Ikea is in Pittsburgh.  One of the trade-offs of moving to Ohio!  I looked into having one shipped, but shipping would cost much more than the shelf itself.

Plan B was 2 short shelves that I could put side by side.  I'm not really having much luck with that one either.  Everything is either very flimsy or way too expensive.  So!  The current plan C is to chuck out the idea of a long, low shelf, and go with a regular tall one.  I know we're going to move again eventually, and I know what a pain it can be to move big bookshelves.  For this reason, I'm thinking of a folding bookcase, like this one from Target, or this one from Amazon.  Do any of my readers have experience with this type of shelving?  Any opinion you can offer would be greatly appreciated!

Wednesday, August 22, 2012

It's Simplicity 2593!

Yes, yes it is.
I didn't realize how popular this (sadly, out of print) Cynthia Rowley pattern was until I started sewing it up.  There are lots of other blog posts about it out there!  I find it helpful to read about other people's experiences with a pattern.  Maybe there's a mis-print.  Maybe they needed to make adjustments.  It's so good to know these things in advance.

It all came together easily enough.  I did end up taking it in a bit at the sides and up in the shoulders.  This is a pretty boxy design without a lot of shaping elements, so I chose a fabric with more drape in hopes that I wouldn't end up looking like a giant rectangle.

I had to make some adjustments to the twisty neckline bit.  That was probably the fussiest/hardest part to get just right.  Having a dress form really helped in this case.  Being able to pin the twisty bit onto the neckline and not having to wear the actual garment at the same time made things so much easier.

As usual, all materials used were from my never-ending stash.  The fabric, as far as I can tell, is some kind of cotton blend.  It's very drapey and soft.  The print is kind of Pucci-esque, and there are tiny embossed dots all over it.  Who knows where I got it!  The pattern originally called for hand made bias binding at the sleeves and neckline.  Normally I would do just that, but this fabric was so loosey-goosey.  I also happened to have a package of pre-made bias tape in a solid color that coordinated nicely.  So, I opted not to make the bindings by hand. 

I'm not sure if I'll get many (or any) more garments sewn up before our big move.  Right now we're showing our current apartment to prospective tenants, getting estimates from movers, trying to finalize everything at the new place, and packing.  Oh, and we set sail (er, airplane?  then sail?) for Alaska on Friday.  Busy busy! 

You still have a few hours to enter my giveaway for a full sized container of Oh My! Chai drink mix from Tastefully Simple!  Ends at 9pm EST tonight.

Tuesday, July 31, 2012

Thrift Store Rescue and Repair: Green Goddess Dress

My Instragram friends got a sneak peek of this!


I'm not one to completely overhaul a garment and make it into something new. However, if I see something at the thrift store that needs a few minor repairs and changes, I might just buy it.  Such is the case with this dress:  
Dottie couldn't resist posing with me.  Just look at that winning smile!  This dress caught my eye while browsing around Family Thrift.  It was my color (green!), a shape I love to wear, and only a few dollars.  Sure, it had a couple of minor issues, but I knew I could take care of them.


A close up of the twisty shoulder details.  You can also see remnants of one of the 'issues' I mentioned.  The neckline had giant green oval gems stitched on along the edge.  They weren't really my style, and they were also far too heavy for the dress.  They actually caused a hole that was large enough to need stitching on the right side (can you see it?), along with little pin-sized holes everywhere else.  They're not super noticeable, and I'm hoping they'll diminish after the next wash.  


Another small hole that needed stitching.  I had thread on hand that matched the color of the fabric perfectly. All I had to do was satin stitch over the hole, and it was almost as good as new.


I have a sneaking suspicion that this may have been used as a swimsuit coverup, but I intend to wear it as a dress.  What have you rescued from the thrift store lately?

Sunday, July 29, 2012

This wristlet is larger on the inside than it appears on the outside.

Did I get that right Dr. Who fans?

Yet another super secret sewing project I can finally share!  I was commissioned to create a mini version of the TARDIS purse I made at Christmas.  I think it turned out well!  I seem to be improving with each TARDIS I make.


A peek at the lining:

The gift-giver who asked me to make this seemed pretty delighted with it, and I hope the recipient is too!

Friday, July 27, 2012

A wadder no more!

Friends, you may remember this little post I did back in March about a couple of my sewing projects that had gone badly.  Well, I managed to save one of them!

Simplicity 2029.  In my last post, I mentioned that it still seemed too big after taking it in by an inch and that the neckline was weird.  No more!  I took it up by 1/2" in the shoulders, which helped the neckline problem quite a bit.  Still, even after that little change, there was something off about it...


...which led me to change the way I was using the ties.  This top is technically supposed to be tied at the back.  I'm not really a fan of back ties on myself.  They tend to look a little...maternity.  Nothing against maternity clothing or those who are currently pregnant, it's just that I am NOT pregnant.  So, I decided to try tying a bow in the front.  Voila!  A top that is about 20 times cuter than before.


I'm pretty pleased with how it turned out after my tweaks, and even more pleased that I managed to finish it in time to wear while there's still some summer left.   

Wednesday, July 18, 2012

Latte Changing Pad

Another project from One Yard Wonders (the first volume)!  Also one of the super secret projects I couldn't post about right away because it was a gift.


A friend of mine (introduced to me through my bestie, MaryAnn) is expecting her first child.  My immediate thought was to make a Newborn Flyaway Jacket.  Usually I do a little coordinating onesie with the jacket.  As I was flipping through the book, I stopped at the project that appears right before mine, the Latte Changing Pad.  I had all of the necessary supplies.  It looked pretty simple to put together.  So, I decided to change my usual baby gift up a bit.


Unrolled with its coordinating pouch.  The pouch is large enough to hold the changing pad, a small package of wipes, and a few diapers, but still small enough to be tossed into a purse.  The book suggests using it when the baby gets a little older and doesn't need a fully packed diaper bag on short errands.


All rolled up!  The whole project technically requires a single yard of fabric, but I decided to change it up a bit and use different fabrics for the pouch and the pad.  The top of the pad is flannel (leftover from the jacket, purchased expressly with the new momma in mind) and is backed in a gray linen-look fabric.  There's some nice soft fleece inside the pad.  The pouch is green, tweedy sort of fabric, but can be machine washed.  All fabrics (except the flannel) are from my stash.


The complete set!  The bias tape on the jacket matches my dining room chairs :)


I'm off to Ohio for a few days.  Ed's sister has finished her summer internship, so we're taking her back home.  Have a good rest-of-the-week, readers!

Monday, April 30, 2012

Stitched Mother's Day Card Tutorial

A few of you may remember my post about re-purposed cards waaay back from the beginning of this blog.  Admittedly, I don't do a lot of paper crafts.  As much as I would like to TRY ALL THE CRAFTS , I strive to limit myself a bit when it comes to supplies.  Otherwise, you'd see me on Hoarders.  I do like to keep a few basics on hand from other crafty areas though.  A few years back I picked up a big box of pre-folded blank cards with matching envelopes on clearance at JoAnn's with the intention of making all of my Christmas cards.  Yeah, didn't happen.  I still have about 93 of the 100 blank cards.

After searching for Mother's Day cards at a supremely overcrowded Wal-Mart in Skokie and coming up empty handed, I decided to make my own.  Here's what I came up with:


Charming in kind of a wonky way, yes?  Here's how you can make your very own.

Start by tracing a heart onto the inside front of your card.

Carefully cut out the heart using a very sharp craft knife.  I decided to treat myself to this one by Fiskars, and I love it!  It's very comfortable to hold and allows for a lot of control.

Choose the fabric you'd like to use for your heart and cut it to size.  You don't need much, so this is a great project for using up small scraps.

Next, apply some double sided tape to the inside of your card, and place your fabric piece over it.

And here's what it should look like from the inside and outside of your card.  I used a couple of different fabrics, as you can see.
Now it's time to stitch!  When you're sewing regular projects with fabric, machine needles tend to dull pretty quickly.  It's a good idea to use a fresh, sharp needle with each new project.  You may be able to eke out 2 or 3 smaller items.  Rather than throwing these spent needles away, I like to set them aside and use them for sewing on paper.

I've used my quarter inch piecing foot here.  It tends to hold things in place a little better. Stitch very slowly around the outside of your heart, especially around the curved parts.  I find it easier to start at the bottom point and work my way around. 

Here they are, hot off the sewing machine:

Next, apply the rick rack trim.  I used a tiny bit of white glue to hold it in place before stitching.  It worked fine on the green trim (which is cotton), but not on the blue (which is polyester).  I had to use a bit of double stick tape on each end to hold the blue trim in place.

And that's pretty much it!  I applied an additional piece of card stock with double stick tape behind the fabric heart to give the card a little more stability.
Just add a message and they're ready to send.  I'm thinking, "Sending love your way for Mother's Day!"  Kind of cheesy, but isn't that sort of what greeting cards are about?

Thursday, April 12, 2012

Sewing, Mad Men Style

After a nearly year and a half absence, Mad Men has FINALLY made its return!  I couldn't be more excited.  It's so weird to think about how different my life was when the last episode of the previous season aired...anyway!  I thought I'd put together a little collection of Mad Men-esque patterns from my shop.

Doesn't this look just like something one of the secretaries at SCDP would wear?  The drawing in the middle even looks a bit like a lighter haired version of Pete Campbell's secretary, Clara.


This one has Betty Draper, er, I mean, Betty Frances written alllllll over it.  Maybe not for the series at its present time, but definitely in its earlier days.


Some Sally Draper style jammies.  How cute is the bunny pajama pillow?


This one was published a bit later (1968) than where the series is at now, but we've already gotten a taste of similar styles on the show.  The center dress is reminiscent of what Trudy Campbell wore to Don's surprise party, and doesn't the drawing on the far right look a little like Megan Draper?

These (and many other) patterns are all available to purchase for your sewing pleasure in my Etsy shop!

ShareThis